

How to Choose a Sleeping Pad for Backpacking: 2026 Guide
Oct 20 , 2026
Table of Contents
- Start With the Trip: A Decision Framework for Choosing a Sleeping Pad
- Sleeping Pad Types for Backpacking: Air, Self-Inflating, and Closed-Cell Foam
- Backpacking Sleeping Pad R-Value: How Much Insulation Do You Need?
- Sleeping Pad Size and Fit: Length, Width, and Sleep Position
- Sleeping Pad Weight for Backpacking: Packability and Warmth-to-Weight Trade-Offs
- Comfort, Durability, and Field Maintenance: What to Check Before You Buy
- Conclusion
- Frequently Asked Questions
Last Updated: October 17, 2026
Start With the Trip: A Decision Framework for Choosing a Sleeping Pad
The fastest way to choose a sleeping pad for backpacking is to start with the ground you'll sleep on, not the pad in the catalog. Cold ground, hard ground, and long carries each demand something different.

So work backwards. Answer three questions before you spend anything:
- How cold will the ground get? This sets your minimum R-value.
- How far are you carrying it? This sets your weight ceiling.
- How do you sleep? This sets your thickness and width.
Get those three right and the shortlist writes itself. Get them wrong and no amount of money fixes a miserable night.
Below, we'll walk through each factor in order, then give you a simple decision tree at the end.
Sleeping Pad Types for Backpacking: Air, Self-Inflating, and Closed-Cell Foam
Three pad types cover almost every backpacking trip: air pads, self-inflating pads, and closed-cell foam. Each trades comfort, weight, and durability differently.
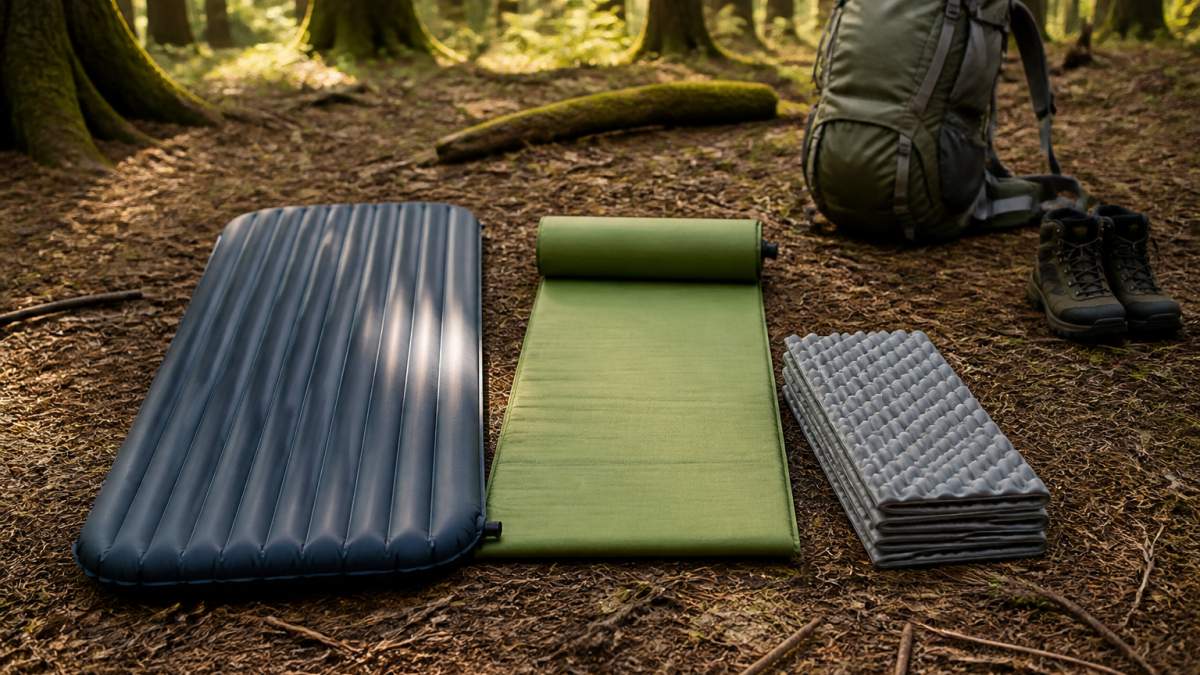
Air pads use baffled chambers filled by breath or a pump sack. They pack smallest and sleep softest.
Self-inflating pads combine open-cell foam with air. Open the valve and the foam pulls air in.
Closed-cell foam pads have no air to lose. They cannot puncture, they work as a backup, and they cost the least.
Air Pads, Self-Inflating Pads, and Foam Pads Compared
| Type | Packed Size | Comfort | Durability | Best For |
|---|---|---|---|---|
| Air pad | Smallest | Highest | Lowest | Ultralight three-season trips |
| Self-inflating | Medium | Good | Medium | Car camping and casual backpacking |
| Closed-cell foam | Largest (strapped outside) | Lowest | Highest | Winter backup and budget trips |
A common mistake is treating foam as the "cheap option" only. In practice, many winter backpackers carry a short foam pad under an air pad for extra insulation and puncture protection. That pairing is one of the most reliable sleep systems you can build.
Backpacking Sleeping Pad R-Value: How Much Insulation Do You Need?
Sleeping pad R-value measures how well a pad resists heat loss to the ground. Higher numbers mean more insulation. For three-season backpacking, look for an R-value around 3 to 4. For winter camping, aim for 5 or higher.
Here's the part most guides skip: the ground steals heat faster than cold air does. A pad with a low R-value feels fine in a warm tent and freezing on snow.
How R-Value Works With Your Sleeping Bag, Clothing, and the Ground
Your sleep system is only as warm as its weakest layer. A winter-rated sleeping bag on a summer pad still leaves you cold from below.
- Ground conditions matter. Snow and cold rock pull heat away faster than dry forest soil.
- Clothing adds a little, not a lot. A fleece layer helps, but it cannot replace insulation under you.
- Stacking pads adds up. Two pads together insulate better than either alone.
Sleeping Pad Size and Fit: Length, Width, and Sleep Position
Sleeping pad size and fit decide whether you actually sleep or just lie awake adjusting. Most backpackers need a pad at least 51 centimetres wide and long enough to cover shoulders to hips. Side sleepers should size up in width.
Length options break into three groups:
- Full length: covers head to toe, heaviest
- Three-quarter length: covers shoulders to knees, saves weight, needs a pack under your feet
- Short pad: lightest, best for warm trips and committed ultralight hikers
The Numbers That Actually Matter
Pad dimensions are usually listed as length × width × thickness. Two pads with the same width can feel completely different because of how the baffles are shaped and how much of the edge tapers. Use these as starting points, then adjust for your body and sleep style:
- Width: 51 cm is the common minimum for a full-length pad. If you are broad-shouldered or sleep on your side, 58-64 cm is a more realistic target. A 51 cm pad that feels fine on your back can feel cramped the moment you roll onto a shoulder.
- Length: a full-length pad should run from the top of your head to at least your ankles. If you are taller than about 183 cm, check the manufacturer's long version rather than assuming the standard length fits.
- Thickness: thickness is a comfort number, not a warmth number. Under roughly 6 cm, many side sleepers feel hips and shoulders bottom out against the ground. Look for 7 cm or more if you sleep on your side.
Fit Testing for Side Sleepers, Restless Sleepers, and Couples
Side sleepers need thickness, not just width. A pad under about 6 centimetres thick lets hips and shoulders bottom out. Look for 7 centimetres or more.
Restless sleepers should prioritise a wider pad and a textured surface. Slippery pads plus a mummy bag equal a long night of readjusting.
Couples face a different problem. Two narrow pads drift apart at the seam. Either strap them together or choose a wider double pad, and accept the extra weight as the cost of a shared shelter.
Matrix Air-Cell Memory Foam Camping Mattress →
A Quick Fit Checklist Before You Buy
- Lie on the pad on your side and check hip and shoulder clearance.
- Roll from back to side to stomach and see whether you stay on the pad.
- Check the length against your height, not the pad's marketing label.
- If you share a tent, test whether two pads sit side by side without overlapping.
- Confirm the packed size fits your pack's sleeping-bag compartment or strapping system.
Sleeping Pad Weight for Backpacking: Packability and Warmth-to-Weight Trade-Offs
Sleeping pad weight for backpacking usually lands between roughly 300 and 900 grams, depending on type and warmth. The lightest air pads sit at the bottom of that range.
Packability follows weight closely. Air pads roll to the size of a water bottle. Foam pads strap to the outside of your pack and collect branches.
The real decision is the warmth-to-weight ratio. A light pad with a low R-value saves grams and costs you sleep.
Comfort, Durability, and Field Maintenance: What to Check Before You Buy
Comfort and durability are where cheap pads reveal themselves, usually on trip two. Check three things before you buy: surface texture, valve quality, and whether a repair kit is included.
Noise, Valve Design, and Ease of Inflation
Some air pads sound like a crisp packet every time you shift. If you share a tent, test the fabric feel in store or read owner feedback on noise. A brushed or matte top sheet is usually quieter than a smooth, shiny one.
Valve design matters just as much. A two-valve system lets you inflate without losing air on the deflate side.
Puncture Resistance, Repair Kits, and Expected Lifespan
No inflatable pad is puncture-proof. The question is how well it handles one.
- Check the fabric denier. Higher denier means tougher, heavier fabric. A 20-denier face fabric is light and packable; a 40-denier or higher fabric resists abrasion better but adds weight.
- Carry a repair kit. Patches and adhesive weigh almost nothing and save trips. Most pads ship with a small patch kit; if yours does not, add one.
- Inspect before you pack. A tiny thorn left in the fabric becomes a slow leak at camp.
Field Repair: A Step-by-Step Routine
A puncture on trail does not have to end the trip. A simple field routine handles most leaks:
- Find the leak. Inflate the pad, listen for the hiss, and run a wet hand or a soapy cloth over the surface, bubbles mark the hole.
- Mark and clean. Circle the spot with a marker or a bit of tape, then clean and dry the area so the patch adheres.
- Apply the patch. Use the manufacturer's patch or a self-adhesive patch, press firmly, and let it set before inflating. Avoid inflating fully until the patch has had time to bond.
- Test before you sleep. Inflate the pad and check that the patch holds before you commit to the night.
For a slow leak you cannot find, a common pattern is to inflate the pad, submerge sections in a stream or lake, and watch for bubbles. If the leak is at the valve rather than the fabric, check that the valve is seated and free of grit before assuming the pad is ruined.
Care Between Trips and Expected Lifespan
Store inflatable pads loosely rolled with the valve open, not compressed in a stuff sack, long-term compression can fatigue the foam and baffles. Keep them away from sharp objects and hot surfaces, and clean with mild soap and water rather than solvents.
With care, a quality air pad lasts several seasons. Foam pads last far longer because there is nothing to puncture. If longevity matters more than pack size, foam wins.
Conclusion
Picking a pad is really a test of honesty about your own trips. Be clear on ground temperature, carry distance, and how you sleep, and the choice becomes simple.
If you want comfort-first gear for basecamps and car camping, Wild For Wellness Co stocks dependable options built for lasting performance. Explore our camping range.
Get started with Wild For Wellness Co and gear up for your next trip with confidence.
Frequently Asked Questions
How heavy should a sleeping pad be for backpacking?
There is no single number, but most three-season backpackers aim for a pad between roughly 400 and 700 grams (14 to 25 ounces). Ultralight air pads can drop below 400 grams, while closed-cell foam pads are often lighter still but less comfortable. Self-inflating pads and thicker comfort pads usually sit at the higher end. Weigh the pad against your total pack weight and the warmth you need: a lighter pad saves energy on the trail, but only if it still keeps you warm enough for the conditions you expect.
What R-value sleeping pad do I need for backpacking?
For three-season backpacking, look for an R-value of about 2 to 3. Summer trips on warm ground can work with an R-value near 2, while spring and autumn trips or cold sleepers often want an R-value of 3 to 4. Winter camping and snow usually call for an R-value of 5 or higher. The pad's R-value works with your sleeping bag and clothing, so a warmer pad can extend the range of a lighter bag. Match the R-value to the coldest ground you expect, not just the air temperature.
Should I choose an air, self-inflating, or closed-cell foam sleeping pad?
Air pads are light and pack small, and they offer the most comfort per gram, but they need inflation and careful handling around sharp objects. Self-inflating pads combine foam and air for a balance of comfort and durability, though they are usually heavier and bulkier. Closed-cell foam pads are the most durable and puncture-proof, and they work as a backup or a sit pad, but they are less comfortable for a full night. Your choice depends on how much weight and packed size you can accept versus how much comfort and simplicity you want.
How do I choose the right sleeping pad size for backpacking?
Start with your sleep position. Back sleepers can often use a regular pad, while side sleepers usually want a wider pad so their hips and shoulders stay supported. Measure your height and add a little margin if you move around at night. Short and three-quarter-length pads save weight but leave your feet and lower legs off the pad, which can be cold. Couples should check whether two regular pads fit side by side in the tent, or consider a double pad. Always compare the pad's listed length and width with your tent's floor dimensions.